
Introduction
Open with the challenges buyers face when turning a product idea into a manufacturable sanitary pad. Explain that development involves more than choosing a length or adding a logo: materials, absorbent-core design, leak protection, product dimensions and packaging all contribute to the final result. Explain how a structured development process can reduce avoidable sample revisions, improve quotation accuracy and help align the approved sample with the specifications used for mass production.
Developing a custom sanitary pad is a step-by-step process. The goal is not simply to create a sample, but to establish a product specification that can be evaluated, approved and consistently reproduced in mass production.
Step 1. Define Your Product Brief Before Contacting a Manufacturer
Purpose: Help readers turn an initial idea into a clear brief that an OEM/ODM manufacturer can assess.
Identify Your Target Market and End Users
- Define the destination market, such as Africa, Southeast Asia, the Middle East, Europe or another region.
- Describe the intended users, their needs and the product’s expected use cases.
- Clarify the product positioning, such as value, mainstream or premium.
- Identify the main sales channels, such as supermarkets, pharmacies, distributors, e-commerce or a private-label retail brand.
Define the Product Type and Intended Use
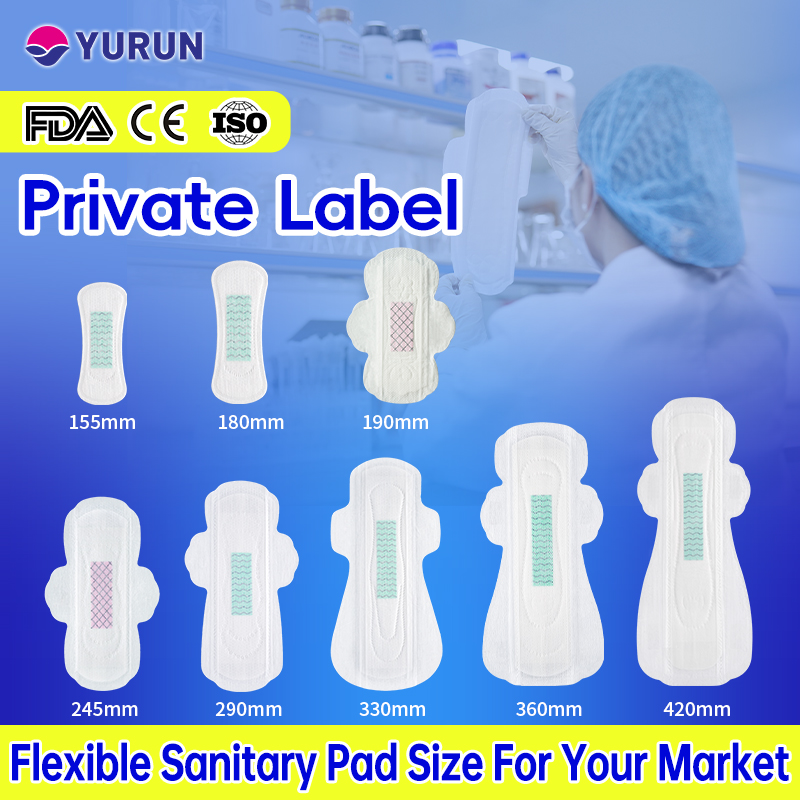
Pantyliners
Regular sanitary pads
Heavy-flow sanitary pads
Overnight sanitary pads
Ultra-thin sanitary pads
Clarify whether the product is intended for everyday use, regular menstrual flow, heavier flow or overnight use. Avoid assuming that a product type alone defines its performance requirements.
Prepare the Initial Product Specifications
| Specification | Questions to Answer |
| Product length | What length are you targeting? |
| Product shape | Do you prefer a straight, contoured or other shape? |
| Absorbency | What performance level or use case do you need? |
| Topsheet | Do you have a preferred material or surface feel? |
| Absorbent core | Do you have a preferred core structure or thickness? |
| Leak protection | Do you need wings, side barriers or extended rear coverage? |
| Packaging | How many pads per pack? Is individual wrapping required? |
| Target market | Which country or region will the product serve? |
| Estimated quantity | What is the initial order volume and SKU plan? |
Key takeaway: Buyers do not need to finalize every technical detail before contacting a manufacturer. A clear product concept, target market, reference product and preliminary order estimate can provide a practical starting point.
Step 2. Choose the Right Materials and Product Structure
Purpose: Show that product customization involve a coordinated design across multiple components—not simply changing the product’s appearance.
Select the Topsheet
- Consider the available material types, surface feel and structure.
- Assess how the topsheet works with the absorbent core and the complete fluid-management system.
- Use samples to evaluate tactile feel and overall performance.
Design the Absorbent Core
- Discuss available structures, such as SAP-based cores or fluff pulp combined with SAP, depending on the manufacturer’s capabilities.
- Define core dimensions, thickness and structure.
- Balance absorption, retention, rewet, flexibility and product thickness.
- Avoid judging performance by core thickness alone.
Customize Leak Protection and Pad Shape
- Choose winged or wingless designs.
- Consider side barriers, where available.
- Confirm length, width and rear-coverage requirements.
- Match the shape and coverage to the product’s intended use.
Confirm Other Components
- Acquisition/distribution layer, if the product uses a separate layer.
- Embossing pattern and layout.
- Backsheet material and properties.
- Release liner design.
- Individual wrapper and retail packaging.
Internal-link opportunity: “For a closer look at the available options, see our guide to What Can You Customize in OEM Sanitary Pads? A Component-by-Component Guide.”
Editorial note: Focus this section on how to make product-development decisions. Link to the component-by-component article for detailed explanations of individual materials and components.
Step 3. Review the Technical Specification and Get a Quotation
Purpose: Explain why a quotation should be based on an agreed product brief rather than a product name or a general description alone.
What Should Be Included in a Product Specification?
- Product type, dimensions and structure.
- Key materials and preferred configurations.
- Packaging format, pack count and SKU plan.
- Quality requirements and relevant test methods.
- Target market and documentation needs, where applicable.
What Affects the Quotation?
- Raw-material type and usage.
- Product dimensions and structural complexity.
- Packaging materials, printing method and order quantity.
- Total order volume and number of SKUs.
- Special testing, tooling or development requirements.
Clarify MOQ, Lead Time and Development Requirements
- Confirm the minimum order quantity and how it applies to each SKU.
- Distinguish sample-development time from bulk-production lead time.
- Check whether packaging design, material sourcing or testing affects the project schedule.
- Separate confirmed specifications from options that still need evaluation.
Key takeaway: A quotation is more useful when the product specification, quantity, packaging and quality expectations are clear. Compare supplier quotations on an equivalent basis rather than looking at unit price alone.
Step 4. Develop the First Sample
Purpose: Demonstrate the role of the OEM/ODM manufacturer in translating requirements into a physical product that can be evaluated.
Translate the Product Brief into a Physical Sample
- Select suitable materials based on the agreed product requirements.
- Confirm the product structure, dimensions, shape, embossing and leak-protection design.
- Produce a sample that reflects the current specification.
- If a requested feature is not feasible as specified, explain the limitation and propose alternatives for the buyer to assess.
Evaluate the Sample Beyond Appearance
| Evaluation area | What to review |
| Appearance | Dimensions, shape, embossing and overall workmanship. |
| Material and feel | Topsheet feel, softness and overall construction. |
| Absorbency performance | Absorption, retention and rewet under agreed test conditions. |
| Leakage protection | Design suitability and performance under the selected evaluation method. |
| Adhesive and release liner | Adhesive function and ease of liner removal. |
| Packaging | Pack dimensions, print quality, closure or seal integrity and information accuracy. |
Use test methods and acceptance criteria appropriate to the product. Appearance, touch or a simple demonstration cannot establish every aspect of sanitary-pad performance.
Compare the Sample with the Original Requirements
- Meets requirements: the sample aligns with the agreed criteria.
- Needs adjustment: specific details require revision.
- Requires further evaluation: key specifications or performance characteristics still need to be verified.
Encourage buyers and manufacturers to keep photos, measurement records, test results and specific comments to reduce ambiguity during the next revision.
A real sample-evaluation scene or a labeled product structure image. Use authentic factory or product-development photography where available.
Step 5. Refine the Sample and Confirm Final Specifications
Purpose: Explain how to manage revisions efficiently and how to determine when a sample is ready for formal approval.
Provide Specific and Actionable Feedback
- Identify the component or feature that needs to change.
- Describe the gap between the current sample and the target requirement.
- State the intended outcome as clearly as possible.
- Note whether the change may affect other specifications, cost or lead time.
For example, instead of saying “make it better,” identify whether the concern relates to topsheet feel, core thickness, product dimensions or packaging colors. Specific feedback is easier to evaluate and implement.
Manage Revisions Systematically
- Compile feedback into a written revision list.
- Record each sample version and its corresponding specification.
- Track which changes have been completed and which remain open.
- Reassess performance if a material, structure or dimension changes.
- Ensure all teams work from the same approved version of product and packaging files.
Approve the Final Sample
- Confirm the product structure and materials.
- Check dimensions, shape and key workmanship details.
- Review applicable test results against the agreed criteria.
- Approve packaging artwork, pack count and labeling information.
- Record the approved sample version and related documentation.
Key takeaway: Sample approval should be based on traceable specifications, relevant test results and written confirmation—not simply on whether the sample looks acceptable.
Step 6. Prepare for Mass Production After Sample Approval
Purpose: Connect sample approval to production readiness and explain how documented requirements support consistency in bulk orders.
Establish the Approved Product Specification
- Record material and component specifications.
- Confirm product dimensions and structural requirements.
- Finalize packaging files and printing requirements.
- Document quality standards and inspection methods.
- Keep sample-approval records and reference samples where appropriate.
Align Quality Control with the Approved Sample
- Define incoming-material, in-process and finished-product checks as appropriate.
- Set practical acceptance criteria for critical specifications.
- Agree on how nonconforming products will be documented and handled.
- Confirm relevant test and sampling procedures for the product.
Confirm Production and Delivery Details
- Order quantity and SKU allocation.
- Packaging-material readiness.
- Production schedule and estimated lead time.
- Pre-shipment inspection requirements.
- Shipping packaging and required documents.
Editorial note: Do not promise that sample approval automatically guarantees identical mass-production output. Explain that an approved specification and an appropriate quality-control plan help support product consistency.
Common Mistakes to Avoid When Developing a Custom Sanitary Pad
| Common mistake | Why it matters | Better approach |
| Starting without a clear product brief | Creates repeated clarification and sample revisions. | Define intended use, target market and key requirements first. |
| Focusing only on unit price | May overlook materials, testing, packaging and quality needs. | Compare quotations against equivalent specifications. |
| Judging performance by appearance alone | Appearance does not prove absorbency or leakage performance. | Use agreed test methods and acceptance criteria. |
| Making vague revision requests | Different teams may interpret feedback differently. | Provide specific, documented feedback. |
| Changing specifications after approval without review | Can affect cost, feasibility or performance. | Assess changes and reapprove affected requirements. |
| Approving a sample without written records | Makes later comparisons difficult. | Keep the approved sample and specification records. |
How Long Does It Take to Develop a Custom Sanitary Pad?
The development timeline depends on product complexity, material availability, packaging readiness and the number of sample revisions. A clear product brief and timely feedback can help reduce avoidable delays.
Frequently Asked Questions
What information do I need to develop a custom sanitary pad?
Start with the product type, target market, dimensions, performance requirements, material preferences, packaging needs and estimated order quantity. A reference product can also help clarify expectations.
Can I develop a sanitary pad using a reference sample?
A reference sample can help communicate appearance, dimensions, feel or specific design features. Clarify which attributes should be used as a reference, and ask the manufacturer to assess feasibility and testing needs.
How many sample revisions are usually needed?
There is no universal number. The revision process depends on how clearly the requirements are defined, the product’s complexity, material availability and evaluation results.
Can I customize materials and packaging separately?
Material and packaging requirements can often be discussed separately, but both should be checked for production feasibility, MOQ, lead time and compatibility with the final product.
What is the difference between sample approval and mass-production approval?
Sample approval confirms the agreed product design and specifications. Mass production still requires the relevant production controls, quality checks and pre-shipment requirements to be carried out.
What should I confirm before placing a bulk order?
Confirm the product specification, materials, packaging, acceptance criteria, order quantity, lead time and final document versions.
Conclusion: Turn Your Product Brief into an Approved Sanitary Pad Sample
Summarize the process: Product Brief → Material and Structure Selection → Quotation and Specification Review → Sample Development → Testing and Feedback → Final Approval → Mass-Production Preparation.
Reinforce that clear requirements, systematic sample evaluation and documented approval help buyers make better product decisions and prepare for a smoother transition to bulk production.
“Planning to develop your own sanitary pad range? Share your product concept, target market and estimated order quantity with Yurun. Our OEM/ODM team can help you evaluate material options, define product specifications and move from an initial brief toward sample approval.” HOME – OEM & Private Label sanitary napkins Manufacturer – Global Top Care Manufacturer OEM Factory.